
In this post, we will setup a Cucumber and Selenium WebDriver Project. We will automate the Google calculator feature using cucumber as a TDD framework and Selenium WebDriver for web UI automation. You can download the entire project(18kb only) here – Cucumber with Selenium Sample Project.
The structure of the maven project would be something like this-
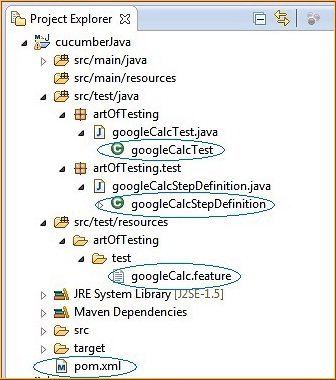
Now we will refer to each file marked in the image one by one.
Content
POM File
A POM file describes all the dependencies required in the project. This project is created as a maven project so all you need to do is include the POM file and all the required dependencies/libraries will get downloaded from maven repositories.
The libraries used in this project are-
- Selenium, JUnit, Cucumber-Java, and Cucumber-JUnit.
- Pom.xml file content-
<project xmlns="http://maven.apache.org/POM/4.0.0"
xmlns:xsi="http://www.w3.org/2001/XMLSchema-instance"
xsi:schemaLocation="http://maven.apache.org/POM/4.0.0
http://maven.apache.org/xsd/maven-4.0.0.xsd">
  <modelVersion>4.0.0</modelVersion>
  <groupId>CucumberJavaProject</groupId>
  <artifactId>cucumberJava</artifactId>
  <version>0.0.1-SNAPSHOT</version>
  <dependencies>
        <dependency>
            <groupId>junit</groupId>
            <artifactId>junit</artifactId>
            <version>4.11</version>
            <scope>test</scope>
        </dependency>
        <dependency>
            <groupId>org.seleniumhq.selenium</groupId>
            <artifactId>selenium-java</artifactId>
            <version>2.39.0</version>
        </dependency>
        <dependency>
            <groupId>info.cukes</groupId>
            <artifactId>cucumber-java</artifactId>
            <version>1.1.2</version>
            <scope>test</scope>
        </dependency>
        <dependency>
            <groupId>info.cukes</groupId>
            <artifactId>cucumber-junit</artifactId>
            <version>1.1.2</version>
            <scope>test</scope>
        </dependency>
    </dependencies>
</project>
Feature File
This file will define the scenario to be tested. In this example we will write a scenario to test the Google calculator. Feature file content-
Feature: Check addition in Google calculatorcontent
   In order to verify that Google calculator work correctly
   As a user of Google
   I should be able to get correct addition result
   Scenario: Addition
   Given I open Google
   When I enter "2+2" in search textbox
   Then I should get result as "4"
Step Definition File
This file implements the steps stated in feature file e.g. for the step “Given I open Google” the step definition file will have a function that will launch a browser and open Google as an implementation to this step.
package artOfTesting.test;
import java.util.concurrent.TimeUnit;
import org.junit.Assert;
import org.openqa.selenium.WebDriver;
import org.openqa.selenium.firefox.FirefoxDriver;
import org.openqa.selenium.WebElement;
import org.openqa.selenium.By;
import cucumber.api.java.After;
import cucumber.api.java.Before;
import cucumber.api.java.en.Given;
import cucumber.api.java.en.Then;
import cucumber.api.java.en.When;
public class googleCalcStepDefinition {


	protected WebDriver driver;

	 @Before
	    public void setup() {
	        driver = new FirefoxDriver();
	}

	@Given("^I open google$")
	public void I_open_google() {
		//Set implicit wait of 10 seconds and launch google
		driver.manage().timeouts().implicitlyWait(5, TimeUnit.SECONDS);
		driver.get("https://www.google.co.in");
	}

	@When("^I enter \"([^\"]*)\" in search textbox$")
	public void I_enter_in_search_textbox(String additionTerms) {
		//Write term in google textbox
		WebElement googleTextBox = driver.findElement(By.id("gbqfq"));
		googleTextBox.sendKeys(additionTerms);

		//Click on searchButton
		WebElement searchButton = driver.findElement(By.id("gbqfb"));
		searchButton.click();
	}

	@Then("^I should get result as \"([^\"]*)\"$")
	public void I_should_get_correct_result(String expectedResult) {
		//Get result from calculator
		WebElement calculatorTextBox = driver.findElement(By.id("cwos"));
		String result = calculatorTextBox.getText();

		//Verify that result of 2+2 is 4
		Assert.assertEquals(result, expectedResult);

		driver.close();
	}

	 @After
	    public void closeBrowser() {
	        driver.quit();
	 }
}
JUnit Test Runner file
The JUnit Test runner file will be used to run the project as a maven test.
package artOfTesting;
import org.junit.runner.RunWith;
import cucumber.api.junit.Cucumber;
@RunWith(Cucumber.class)
public class googleCalcTest {
}
In order to run the project just right click on the JUnit test runner file and click on “Run As -> JUnit test”, you can also run the project by right-clicking on the project and clicking on “Run As -> Maven test”.
This completes our post, do let us know in case you face any issue on setting up your Cucumber with Selenium testing project.